As software developers, sometimes it’s necessary to create a web application that captures audio or video and to manage media devices such as webcam, microphone or speakers. With this in mind, the goal of this article is to review how to capture video and audio streams using WebRTC API, a Web Real-Time Communication, that allows us to quickly develop a web application with media features that are easy to maintain.
What is WebRTC?

WebRTC (Web Real-Time Communication) is a free, open project that provides web browsers and mobile applications with Real-Time Communications (RTC) capabilities via simple application programming interfaces (APIs). It allows audio and video communication to work inside web pages. It’s supported by Apple, Google, Microsoft, Mozilla, and Opera. WebRTC is being standardized through the World Wide Web Consortium (W3C) and the Internet Engineering Task Force (IETF).
Audio Capabilities
WebRTC offers a complete stack for voice communications. It not only includes the necessary codecs but other components necessary to great user experiences as well. This includes software-based acoustic echo cancellation, noise reduction, and hardware access and control across multiple platforms.
Video Capabilities
The WebRTC project builds on the VP8 codec. It includes components to conceal packet loss and clean up noisy images, as well as capture and playback capabilities across multiple platforms.
Why WebRTC
WebRTC allows us to manage media communication inside web pages by allowing direct peer-to-peer communication, eliminating the need to install plugins or download native apps. Consequently, we don’t need plugins such as Flash and SilverLight (image below):

It’s supported by the most browsers and platforms, except for Internet Explorer:

There are many types of WebRTC applications, such as multi-party video conferencing, broadcasting, screen sharing, real-time chats, video-based discussions, virtual tour, video recording, taking photos from a webcam, etc.
WebRTC Development
The MediaDevices.getUserMedia() WebRTC method requests permission to use a media input that produces a media stream with tracks. This media stream can include a video track (produced by a web cam, video recording device, screen sharing service, etc), and/or an audio track (produced by a microphone).
The MediaDevices.getUserMedia() method returns a promise that resolves to a MediaStream object. If the user denies permission, or matching media is not available, then the promise is rejected with NotAllowedError or NotFoundError respectively.
Video Capture
To capture a video stream produced by a webcam, we create an HTML video element <video>, with the ‘autoplay’ attribute to automatically play the video:
<video autoplay></video>
Then, using JavaScript, we create a constraint with the video parameter equal to “true” to capture a video stream. The navigator.mediaDevices.getUserMedia is called to request permission to use the webcam, which receives the constraint and returns a promise that calls the function “handleSuccess” in case of success; otherwise, the function “handleError” is called. The “handleSuccess” function is called when a video stream produced by a webcam is found and then the HTML Video element is fed with the video stream; otherwise, the “handleError” function is called where the video capture errors are displayed.
<script>
	const constraints = {
		video: true
	};

	function handleSuccess(stream) {
		document.querySelector('video').srcObject = stream;
	}

	function handleError(error) {
		console.log('getUserMedia error: ', error);
	}

	navigator.mediaDevices.getUserMedia(constraints)
			.then(handleSuccess)
			.catch(handleError);
</script>
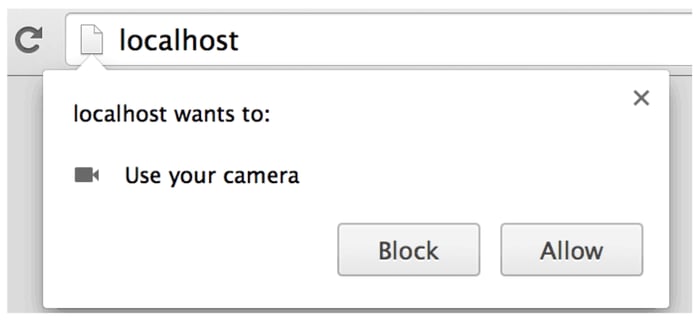
All browsers will display a permission dialog when the MediaDevices.getUserMedia() is called, which offers users the option to grant or deny access to their webcam. Here is the Chrome permissions dialog:
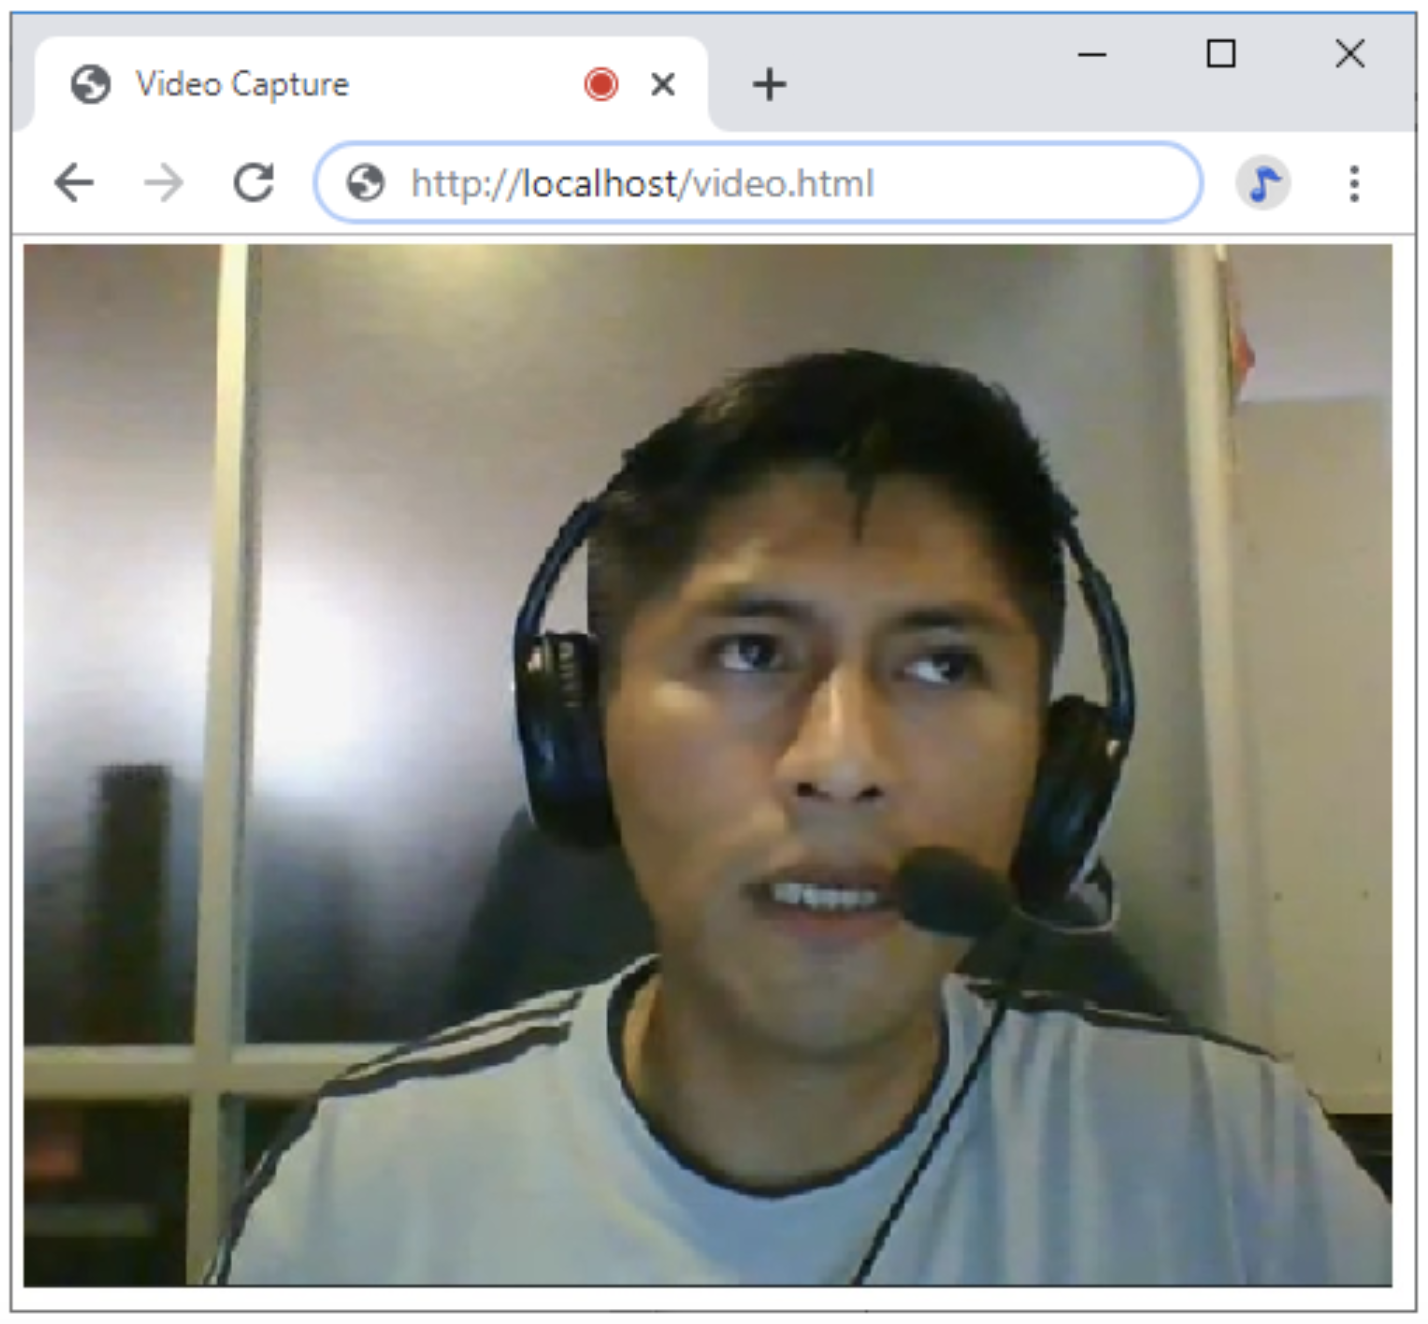
Then, when the user grants permission to access the webcam, the HTML video element is displayed with the video stream produced by a webcam:
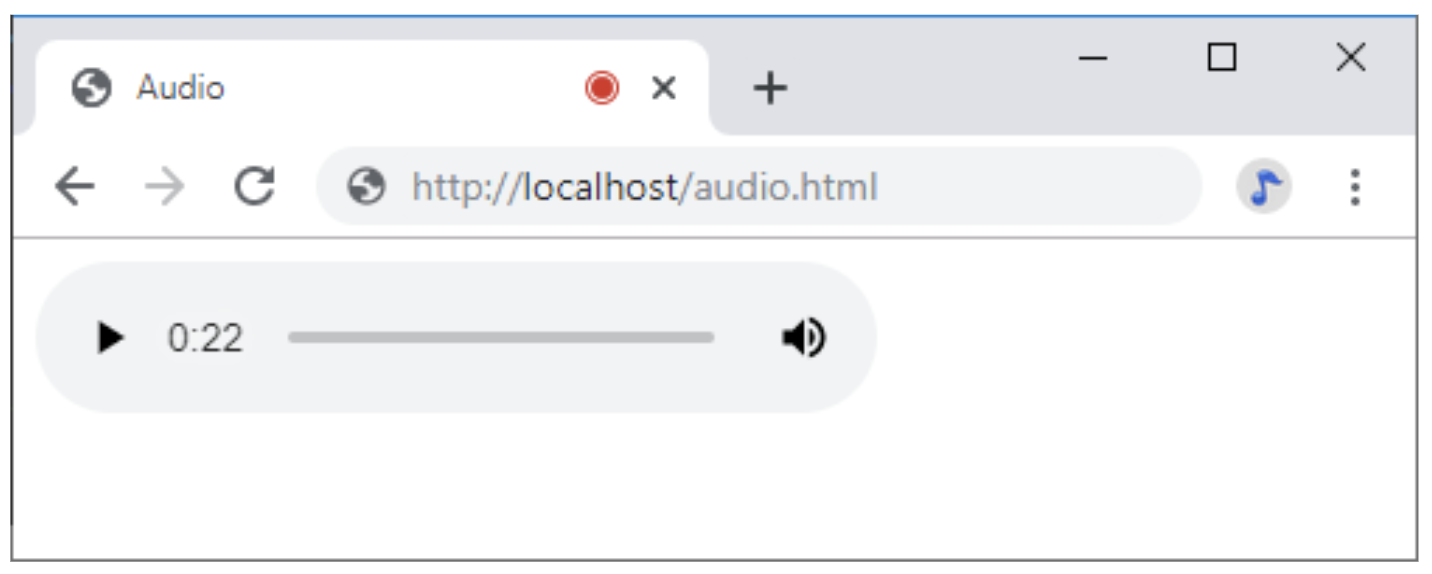
Audio Capture
To capture an audio stream produced by a microphone, we create an HTML Audio element <audio> with the ‘autoplay’ attribute to automatically play the audio and the ‘controls’ attribute to display the audio controls, like the volume:
<audio autoplay controls></audio>
Using JavaScript, we create a constraint with the audio parameter equal to “true” in order to capture an audio stream. The navigator.mediaDevices.getUserMedia is called to request permission to use the microphone, which receives the constraint and returns a promise that calls the function “handleSuccess” in case of success; otherwise, the “handleError” function is called. The “handleSuccess” is called when an audio stream produced by a microphone is found, and then the HTML Audio element is fed with the audio stream; otherwise, the “handleError” function is called where the audio capture errors are displayed.
<script>
	const constraints = {
		audio: true
	};

	function handleSuccess(stream) {
		document.querySelector('audio').srcObject = stream;
	}

	function handleError(error) {
		console.log('getUserMedia error: ', error);
	}

	navigator.mediaDevices.getUserMedia(constraints)
			.then(handleSuccess)
			.catch(handleError);
</script>
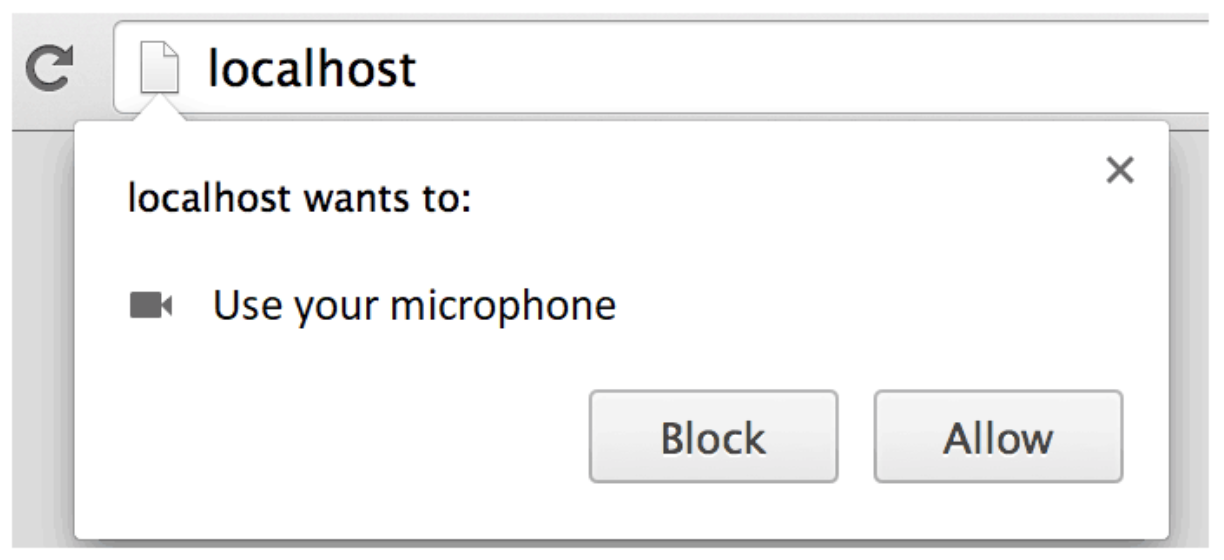
All browsers will display a permission dialog when the MediaDevices.getUserMedia() is called, which offers users the option to grant or deny access to their microphone. Here is the Chrome permissions dialog:
Then, when the user grants permission to access the microphone, the HTML Audio element is displayed with the audio stream produced by the microphone:
Screen Capture
If we want to capture a video stream produced by a screen, we create an HTML Video element <video>, with the ‘autoplay’ attribute to automatically play the video. The ‘loop’ attribute is included because the video doesn’t have a time duration and the ‘muted’ attribute is included because the shared screen doesn’t contain audio:
<video autoplay loop muted></video>
Using JavaScript, we create a constraint with the video parameter equal to “true” to capture the screen. The navigator.mediaDevices.getDisplayMedia is called to request permission to share the screen, which receives the constraint and returns a promise that calls the function “handleSuccess” in case of success; otherwise, the function “handleError” is called. The “handleSuccess” function is called when a video stream produced by a screen is found, and then the HTML Video element is fed with the video stream; otherwise, the “handleError” function is called where the screen capture errors are displayed.
<script>
	const constraints = {
		video: true
	};

	function handleSuccess(stream) {
		document.querySelector('video').srcObject = stream;
	}

	function handleError(error) {
		console.log('getDisplayMedia error: ', error);
	}

	navigator.mediaDevices.getDisplayMedia(constraints)
			.then(handleSuccess)
			.catch(handleError);
</script>
All browsers will display a permission dialog when the MediaDevices.getDisplayMedia() is called, which shows the screens and offers users the option to grant or deny access to their screen. Here is the Chrome permissions dialog:
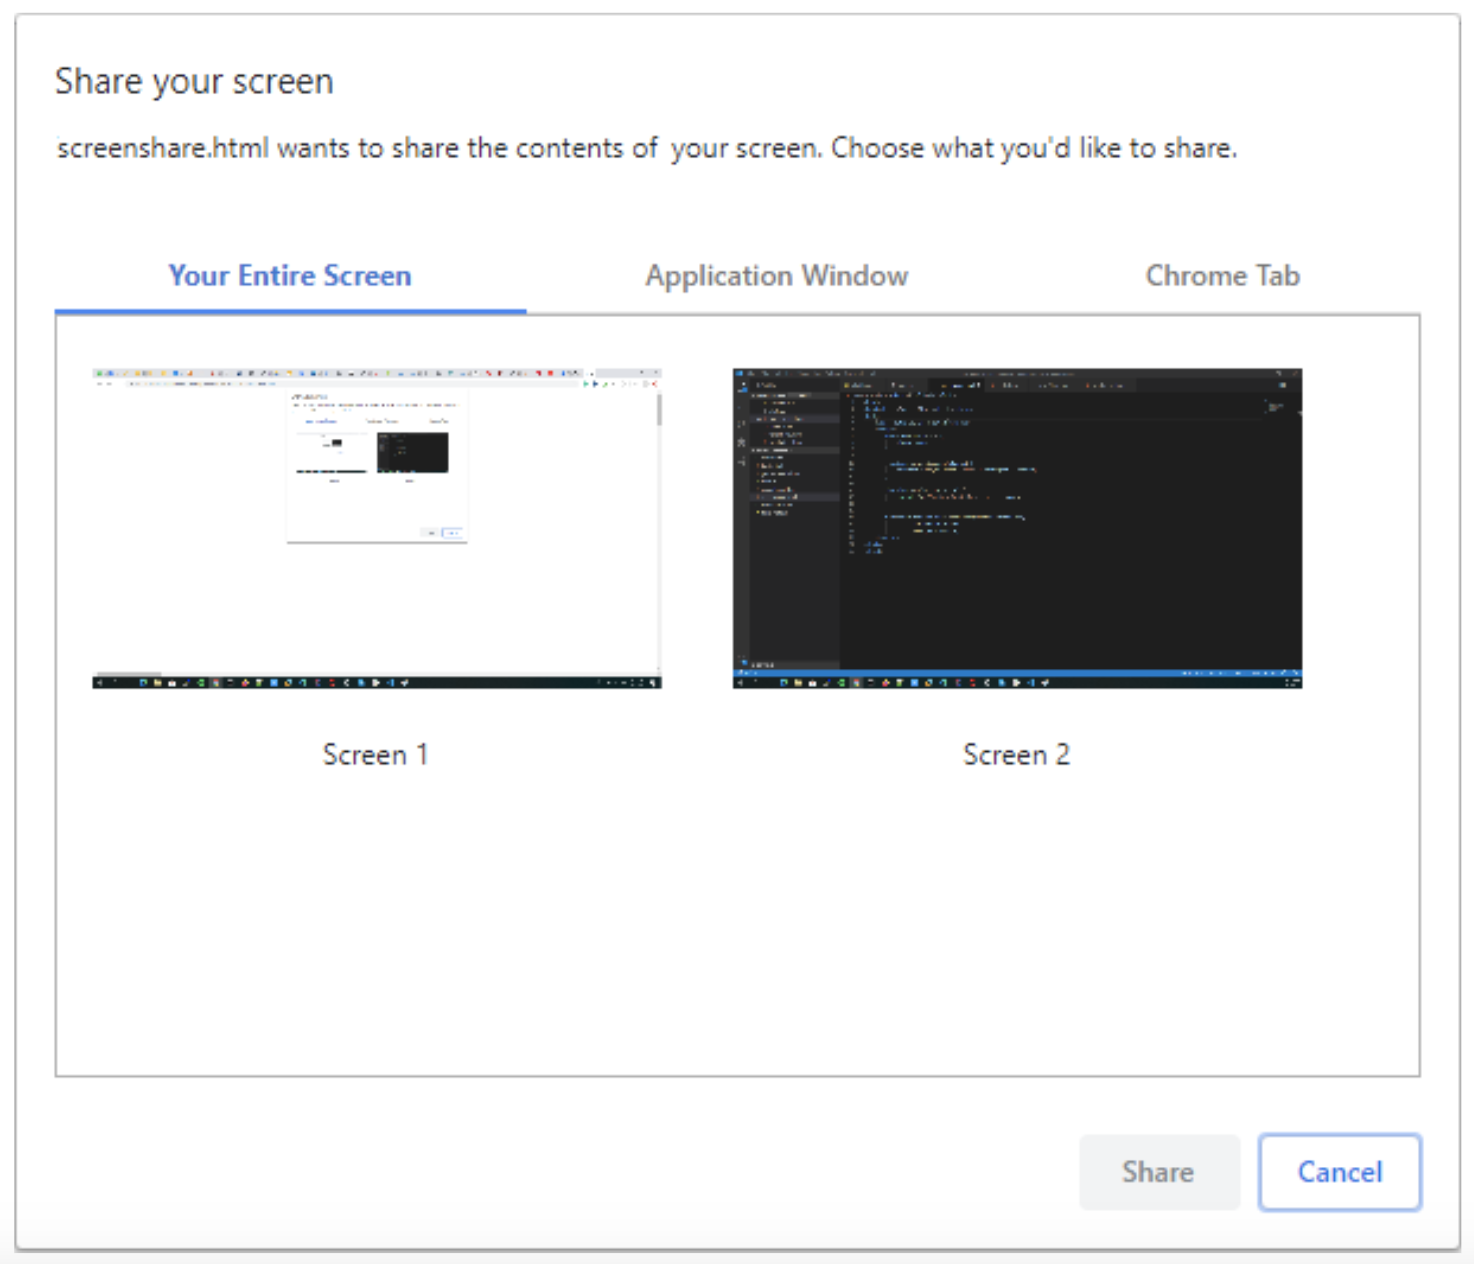
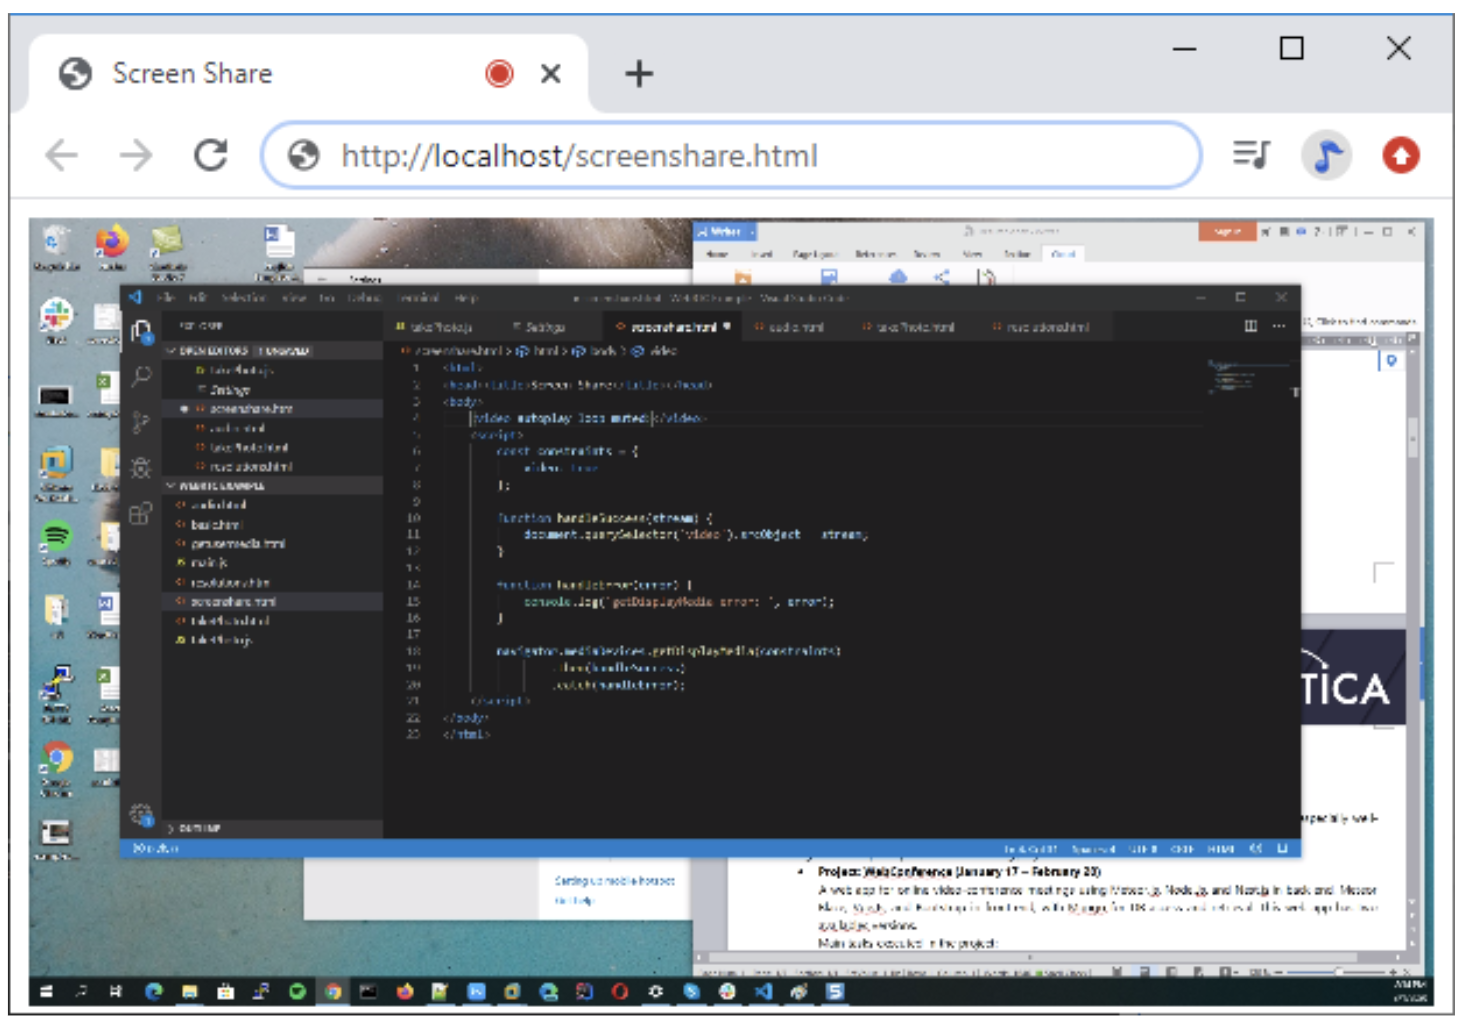
Then, when the user grants permission to share their screen, the HTML Video element is displayed with the video stream produced by the selected screen:
Conclusion
And that’s it! Using a little bit of WebRTC API and HTML/JS, we developed Web applications with media features where it was possible to capture video and audio streams produced by a webcam and a microphone applying the MediaDevices.getUserMedia() WebRTC method. It was also possible to capture video streams produced by a screen using the MediaDevices.getDisplayMedia() WebRTC method.